Monday, February 16, 2015

Crockpot Teriyaki Chicken

Photo by Something Quite Domestic
One of my Facebook friends posted a new recipe and raved about it. I'm always on the hunt for a tasty crockpot dinner that used fresh ingredients and not just a bunch of canned everything. I also love using my slow cooker because it saves time and makes effortless dinners, which I need 99.9% of the time.

The one thing I don't love about slow cookers is that the food looks so boring after cooking. Don't get me wrong, I don't mind if awesome tasting food looks a little ugly, but sometimes it just needs to be dressed up a little. I don't love a bunch of brown matter slopped on top of carbohydrates. I like slicing the chicken the first and then serving it on top of the sauce. Make sure to garnish with green onions or other green herbs to give it some color (cilantro would taste awesome, too.). If I would've thought about it I would have layered it this way: rice, then sauce, then purple cabbage, then chicken, then green onions and sesame seeds.

This is the original recipe and I adapted it slightly. I found that after cooking, some of the flavors were meshed together a little too much, so I brightened them up a bit by adding some lemongrass and more fresh ginger right before serving. I also love using Ultra Set (modified corn starch like Clear Jel, but the liquid doesn't have to be hot to thicken) because it doesn't go watery when it cools or when you reheat leftovers. And who doesn't love leftovers? Ok, well if you are one of those "I'm-too-cool-for-leftovers" people, then I'm not sure we can be friends. Kidding. Ok, maybe I'm not. No, but really, I love leftovers and you could make a lot of fun things with the leftover chicken. You could make chicken sandwiches with slaw, Asian chicken salad, teriyaki won tons, lettuce wraps, etc., so you want to thicken it with something that won't break down during heating and cooling and I find regular corn starch just doesn't work as well. Seriously, can you tell that I love Ultra Set? I bought it at my local kitchen supply place (Kitchen Kneads) and I know you can buy Clear Jel online, but you'll just have to make sure your liquid is hot when thickening. I also love using Ultra Set for homemade canned pie fillings, but that will be for another post.

So here's what you'll need:
-4 large chicken breasts (about 2 lbs.)
-3 cloves of garlic, pressed or minced
-1/2 c. white onion, chopped
-1/2 c. honey
-1/4 c. brown sugar
-2/3 c. soy sauce
-1/2 c. rice wine vinegar
-1/4 tsp. black pepper
-2 TBS freshly grated ginger (do not use powdered)
-1/4-1/3 c. Ultra Set or Clear Jel

To add right before thickening and serving:
-1/2 TBS freshly grated ginger
-2 TBS brown sugar
-2 TBS soy sauce
2 TBS rice wine vinegar
-optional: 1-2 tsp. lemongrass


Garnish:
-Green onions
-Sesame seeds (black and white mixed would look awesome)

1. Place chicken breasts in the bottom of crock pot. Whisk garlic, onion, honey, brown sugar, soy sauce, vinegar, pepper and ginger together. Pour over chicken. Cover crockpot.

2. Cook on high for 4 hours, or until chicken pulls apart easily. If you have the time and are home, cook on high for 2 hours and then turn down to warm for 4-5 hours. The "low and slow" method makes the chicken extra juicy and help prevent dry chicken.

3. Remove chicken from crockpot using a slotted spoon. Stir in the extra ginger, brown sugar, soy sauce and vinegar. Add lemongrass, if desired, for an extra layer of flavor. Stir in Ultra Set.

4. Serve with sticky rice and a side of steamed veggies. Slice or shred chicken. Top rice with teriyaki sauce. Place sliced chicken on top. Sprinkle with sesame seeds and green onions. Or you can shred chicken, combine with sauce and then top over rice.


Photo by Something Quite Domestic


I hope you enjoy this recipe. It's one that has been added to our regular rotation. Here's the printable recipe. 


Happy Cooking!

Saturday, February 7, 2015

Easy Rainbow Birthday Party Theme

So I'm about a year late blogging Kyn's 4th birthday party, but better late than never, right? Kyn wanted to have a birthday party for her 4th birthday and I didn't want to plan one. I was pregnant, uncomfortable, tired, stressed with my job, and a bunch of other stuff going on. She wanted to have a few friends over and I just didn't have the energy to plan a huge party. 
I took the advice of my Mom. She reminded me that all parties don't have to be like the ones found on Pinterest and kids enjoy simple things. I swear I make things way more complicated than they need to be. 

Kyn was obsessed with rainbows at the time and asked for a rainbow birthday party. Unlike her 3rd Brave birthday party, this would be much simpler. Honestly, I have to remind myself that most of the amazing birthday parties that I love reading about have a huge staff of people to pull them off: cooks, bakers, decorators, professional photographers, etc. And not that I don't love planning birthday parties, but sometimes I just need simple. I am not super mom and I'm okay admitting that. 

The party was SO fun! It was fun and easy to plan, I bought most of the decorations from the dollar store, and the kids had a ball. I appreciate that children enjoy simple things. This party was a blast and the kids had so much fun. I literally planned and executed everything in a day and it was all last minute. She got fun gift and we all enjoyed our friends and family that came to wish her a happy birthday. My baby is getting so big. Where does the time even go? 

Here's what we did:

The decor: I went to the dollar store and went to the party section and bought plastic rectangle table coverings in all of the rainbow colors. I bought a package of balloons and made a little bouquet of them for the top of the backdrop. I taped all of the table coverings to the wall and then let them swoop down and secured them to the floor. I placed the balloon bouquet at the top and placed a "Happy Birthday" banner underneath the balloons. I bought a birthday balloon table covering for the main table and accented with balloons of all colors. 


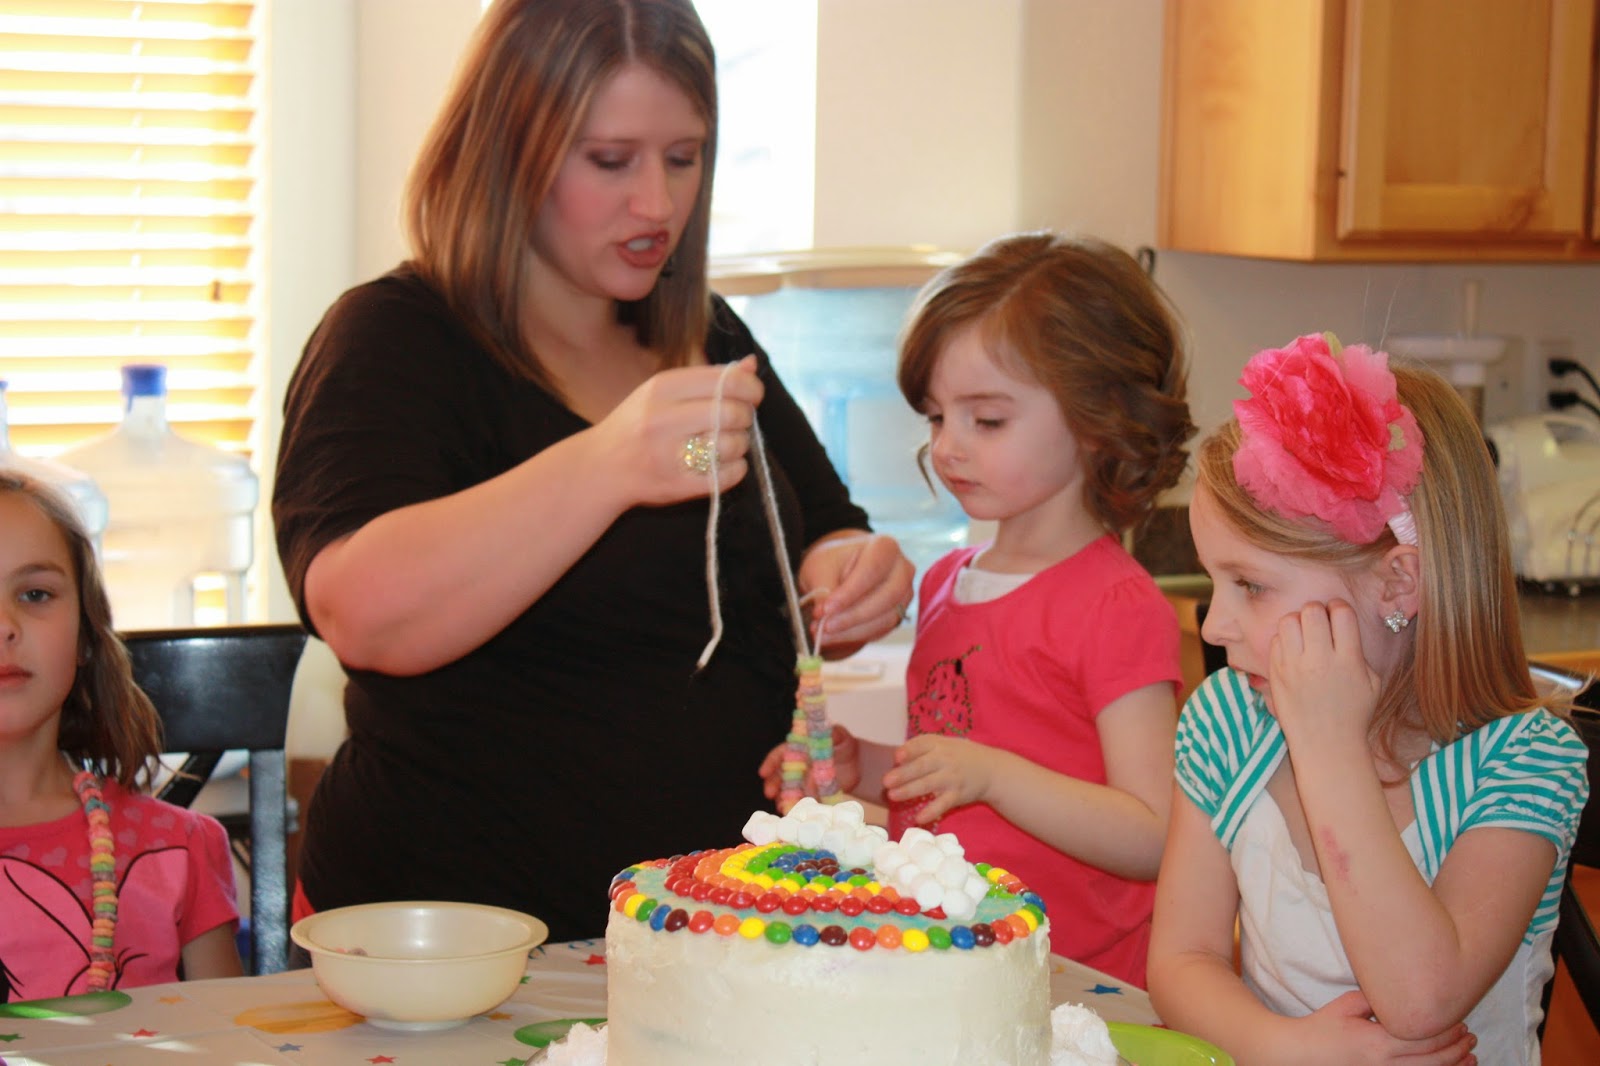
The cake: Kyn really wanted a rainbow cake just like her 3rd birthday. As a surprise I made a pinata cake filled full of skittles. I got the idea from this YouTube video. The concept is really simple: you make 3 round cakes. The middle layer you cut out a hole, fill full of skittles, M&Ms, etc., place the top layer and frost. I decorated the top with Skittles and made a rainbow. I used marshmallows for the clouds. It was so fun to cut into it and Kyn's face when all the candy fell out. :) I made a marbled rainbow cake and the kids loved it. I used the concept from Hub Pages. I loved how colorful in turned out! The marbled cake takes time to do, so if you are in a pinch, you could do 3 different colors and it would still tie into the theme. 


I also make rainbow cupcakes using this idea. They turned out super cute and were perfect for one of the planned activities. 

The activities: We let the kids make Fruit Loop necklaces. We had several bowls of cereal on the table and pieces of yarn cut ahead of time for each guest. Smaller kids sometimes have a difficult time stringing the Fruit Loops so we made sure to put a piece of tape at each end.


The second activity that we did was let the kids decorate the rainbow cupcakes. We had all sorts of rainbow colored candies: Skittles, M&Ms, sprinkles, rainbow Twizzlers, marshmallows, Pixie Sticks, Gummy Starbursts, and SweetTarts. If you have a bulk store in your area (I LOVE Winco) you can probably find all sorts of fun colored candies for decorating with. We made each of the kids a little bag with candy so that it was easier for them to decorate and helped control the candy chaos. I used the leftover frosting from the cake and we let the kids go to town. I think more candy ended up in their bellies than on the cupcakes, but hey, that's what parties are for! 


The favors: I bought the rainbow Twizzler licorice, marshmallows, and snack-sized zip baggies. I put some licorice in the bag in the shape of a rainbow and put marshmallows for the clouds. I stapled a cloud with each guest's name on it in rainbow colors. This was a really fast and simple "thank you" for each guest that came. I loved personalizing them, too. 


Kyn had so much fun with her friends and family. She got an Anna doll, a Hello Kitty spa set, some movies and a bunch of fun toys. 


Friday, January 30, 2015

Chocolate Flan Cake (AKA Magic Cake)

Photo from Something Quite Domestic
Dirk and I love trying flan at different Mexican restaurants in our area. It's fun to see the unique ways people make it and how different they all are. Two of my brothers introduced me to this cake. I never tried making it because it seemed too complicated and I didn't want to spend all day baking one thing. 

Oh, fear not! You do need to plan a little bit in advance because this cake tastes the best when it's chilled overnight, but it's easy to make. This cake preps in less than 30 minutes, bakes in about an hour and in a pinch you could chill it for a few hours before you serve it. 

Why do they call it "Magic Cake"? Because of science and chemistry the two layers switch places during baking. This cake is really fun to make with kids because when you put it in the bundt pan the chocolate batter goes in first and then the flan batter goes on top. During the baking process the flan sinks to the bottom and the cake rises to the top, all in 2 beautiful, distinct layers. Then when you plate it, the flan will be on the top and the chocolate cake on the bottom. It made for a fun experiment and lesson while we baked the cake and a great opportunity to discuss basic principles of chemistry. :)

The sky is the limit with this cake. You can experiment with different extracts, different flavors of cake, etc. 

So another thing, this recipe uses cateja which is caramelized milk. You can make your own or you can go to the Hispanic section of your supermarket and buy it already made if you are pressed for time. 

Okay. Here's what you need:

-Large bundt pan (at least 12 cup size)
-Large roasting pan
-1 can of cateja (can make your own as listed below or buy in the Hispanic section of most supermarkets)

Cateja
-1 (14 oz.) can of sweetened condensed milk

Place unopened can into a large pan and fill pan with water ensuring to cover can completely. Cover pan and bring water to a boil. Turn heat down to med-low and boil can for 3-4 hours. Add more water as necessary to cover can of milk. Remove can from hot water with tongs and allow can to cool. Open can and voila! You have cateja! You can do several cans at the same time so that you can keep some on hand.

Cake:
-1/2 c. unsalted butter, plus 2 TBS at room temp
-1 c. sugar
-1 egg, at room temp
-1 tsp. dark rum
-1 tsp. vanilla extract
-4 oz. bittersweet chocolate, melted
-1/3 c. cocoa powder (if you can find dark chocolate that works best)
-1 3/4 c. flour (best if you can use 1 c. cake flour and the rest all-purpose. I have used all all-purpose and it still works out great.)
-3/4 tsp. salt 
-3/4 tsp. baking soda
-3/4 c. baking powder
-1 1/4 c. buttermilk

Flan:
- 1 (12 oz.) can of evaporated milk
- 1 (14 oz.) can of sweetened condensed milk (splurge for a good brand)
-3 large eggs, at room temp
-4 oz. of cream cheese, at room temp.
-1 TBS vanilla extract

Garnish:
-1/4 c. pecans, chopped
-1/4 c. cateja
-1 TBS whole milk

1. Fill roasting pan with 1 inch of water and place in oven. Preheat oven to 350 degrees. Coat bundt pan with 1 tsp. of butter. Warm 1/2 cup of cateja in the microwave and pour on bottom of the bundt pan. Try not to get on the sides of the pan.

2. Prepare the cake. Place sugar and butter in a mixing bowl and use a hand mixer to beat together until light and fluffy. Add the egg and mix to combine. Next add the rum, vanilla extract and melted bittersweet chocolate and mix until incorporated. In a separate bowl sift or use a wire whisk to combine the cocoa powder, flour, baking soda, baking powder, and salt. Add 1/3 of flour mixture to bowl and half of the butter milk into the egg mixture. Repeat again. Add the last 1/3 of flour mixture and beat until incorporated. The batter will be thick. Carefully spoon the mixture into the bundt pan on top of the cateja. Be careful to avoid spilling the batter on the sides. 

Photo from Something Quite Domestic


Photo from Something Quite Domestic

3. Prepare the flan. Place all ingredients into a blender and blend on high for 30 seconds until well combined. Carefully and slowly pour the flan mixture on top of cake batter in the bundt pan. Cover bundt pan with foil. Remove the roasting pan from the oven and carefully place bundt pan into the water bath. Make sure that the water comes up at least an inch on the bundt pan. Add more hot water to roasting pan if necessary. 

Photo from Something Quite Domestic


4. Place roasting pan back into the oven and bake for 50-60 minutes, until the cake top bounces back or a toothpick comes out clean. Remove roasting pan from oven and remove bundt pan from water bath. Transfer cake to a wire rack and allow the cake to rest in the pan to room temperature, about 2 hours and then refrigerate at least 8 hours or overnight.


5. After the cake is chilled, place 1/3 bottom of the bundt pan in a bowl of hot tap water for about a minute. Invert cake on to a cake platter. Microwave the cateja and milk for about 10-15 seconds. Stir until combine and add more milk if necessary to get the a good consistency so that you can drizzle it on the top of the cake. (You want it thick, but just thin enough to drizzle.) Drizzle the cake with cateja and sprinkle with toasted pecans. 

Photo from Something Quite Domestic

Enjoy a little slice of heaven! The cake is slightly dense and fudgy and the flan is creamy and delicate.

Photo from Something Quite Domestic


Enjoy and Happy Baking!

Here's the printable recipe.